In this navigation guide, we walk you through the entire mobile app experience. If you have a specific question, browse the Nursing Logs Frequently Asked Questions or use the search box and enter a question or topic. If you still need help, please contact your Agency Supervisor.
Contents
- Log in to the app
- Add a shortcut to the app on your mobile device
- Tool Tips
- Create a service log
- Search for a service log
- Edit a service log
- Delete a service log
Log in to the app
You can access the mobile app from any mobile device so long as you have an internet or data connection.
To log in to the mobile app:
- Using your mobile device, open an internet browser, such as Safari or Chrome.
- Enter the following web address: nursing.ecsssonline.k12.hi.us
- Enter the username and password you received from your Agency Supervisor.

If you need to change your username or password, please contact your Agency Supervisor who will work with DOE to modify your login credentials.
Add a shortcut to the app on your mobile device
To save time, you can add a shortcut on your mobile device so that you don’t have to enter the web address every time you need to log in.
For iPhones and other iOS mobile devices
- Open an internet browser, such as Safari or Chrome, and go to nursing.ecsssonline.k12.hi.us
- Tap the share icon, then tap Add to Home Screen.
- On the Add to Home Screen screen, tap Add.
- Go to your home screen to view and move the shortcut icon.
For Android devices
- Open an internet browser, such as Chrome, and go to nursing.ecsssonline.k12.hi.us
- Tap the ellipses, then tap Add to Home screen.
- On the Add to Home screen window, enter a title for the shortcut (optional), then tap Add.
- Either touch & hold the icon to manually place the shortcut on your Home screen or tap Add Automatically.
Tool tips
Tool tips appear when you tap or hover over certain fields and provide helpful hints to complete those fields. You can turn tool tips on or off from the User Preferences menu. Note that tool tips may not appear on some mobile devices.


Create a service log
To create a service log, follow these steps:
- From the Service Logs dashboard, tap Create Service Log.

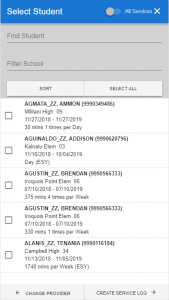
- In the Select Student Service window, select one or more students or services from the list, then tap Create Service Log. For a list of all services, turn on the toggle next to All Services. (By default, the list displays only current services. All Services includes services where the current date is after the service projected end date, but within 365 days of today’s date.)

- The Add Service Log window appears with a tab for each student located across the top.

- If a student’s tab is displayed in yellow, then you can complete that student’s service log.
- If you selected more than one student, you must submit the current student log before navigating to the next, or you can remove a student by tapping the X on the student’s tab.
- Once you’re in the Add Service Log window, additional students can’t be added. Complete and submit logs for the selected students, then go back to create student logs for any additional students.
- Complete the Service Information fields.

- Service Length is automatically calculated when you enter a Start Time and End Time. You can also enter Start Time and Service Length to automatically calculate the End Time.
- The Location Details field is optional to document additional information about the service location.
- Turn on the toggle next to Bus if you provided skilled nursing services during transport.
- Complete the Documentation of Service fields.

- Enter the number of minutes (Note: Total Reimbursable Minutes can’t exceed the minutes you enter in Service Length), indicate the procedures completed, then provide a brief description of the outcome. Tap the + icon to add a new row of procedures or the Trash icon to delete a row.
- Total Reimbursable Minutes is a read-only field that is automatically calculated. This field displays the sum of minutes for Medicaid reimbursable procedures indicated in the Documentation of Service area of the service log.
- If you provided a skilled nursing procedure that is not on the Procedure Description list, type a brief description in the Procedure Description field to add the procedure. Procedures you add are categorized as “Other” and are not considered Medicaid reimbursable.
- If you select a procedure, then want to remove it, tap the X next to the procedure name or tap the Procedure Description field to open the procedure list and unselect the procedure.
- Tap the + icon next to the Outcome field to add another procedure row or tap the Trash icon to remove a row.
- The Submit button is disabled by default. Select one of the available save options to enable the Submit:
- Select Save and Clone, then click Submit to create a copy of the current service log to simplify data entry for a similar service log for the student. You can modify the copied service log as necessary and submit. Note that the Save and Clone option is not available when creating service logs for multiple students.

- The Save and Next Student option is displayed when creating service logs for multiple students. Select this option, then tap Submit to save and submit the current student’s log and open the service log for the next student.

- Select Save and Clone, then click Submit to create a copy of the current service log to simplify data entry for a similar service log for the student. You can modify the copied service log as necessary and submit. Note that the Save and Clone option is not available when creating service logs for multiple students.
- When you submit a service log, the service log record appears.
- To include attachments to the service log, tap the record, scroll down and tap Attachments to upload attachments. On a desktop or laptop, you can also drag and drop files into the field. Note that all personnel are bound by FERPA and HIPAA regulations when storing, uploading, and viewing attachments.
Search for a service log
To help with continuity of service, you may view all service logs for any student that you have access to, including other providers’ logs. Only providers who are currently assigned to a student can view the student’s logs. Please contact your Agency Supervisor if you do not have access to a student you are assigned to.
To search for an existing service log, follow these steps:
- From the Service Logs dashboard, tap Search Service Logs to show the search filters.

- Tap Retrieve Logs to see all your service logs or use the filters to narrow your search by Student, Service Location, or Service Date. Note that the Find Provider field is limited to the provider currently logged in. Admin users with access to multiple providers can filter by the providers they have access to.

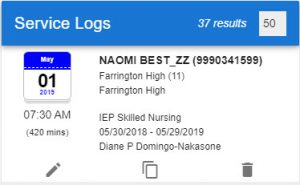
- To view a longer list, in the Service Logs header, click the box to the right of the number of results to display a drop-down list. Select 10, 25, 50, or 100 to designate the maximum number of records displayed per page. Use the arrows at the bottom of the window to access the previous or next page.

- Search for the service log, then tap the record.
- To view an attachment, scroll down to the Attachments field and tap the attachment link to download or open a new window and view.
Edit a service log
As a provider, you can only edit your own service logs. Therefore, if you don’t have edit access to a service log, the edit, copy, and delete icons are not shown. However, you can still tap a record to display a read-only summary of the student’s service log.
To edit an existing service log, follow these steps:
- Search for the student or service log you want to change. (See Search for a Service Log.)
- Tap the Edit icon to open the Service Log window. Note that all changes are tracked and timestamped.

If you notice any error in student information, please contact your Agency Supervisor who will advise DOE of the error.
Delete a service log
If you enter a service log by mistake, you can delete the service log by searching for the log and tapping the Trash icon.
Note that deleted service logs cannot be recovered. Therefore, if you delete a service log by mistake, you need to recreate the log by tapping Create Service Log from the Service Logs dashboard and entering the required information.

